Dirty Footprints Blogging Tutorial
Published on August 17, 2008
Alright chicas!! Gather around….I’m going to give you a little tutorial on how to use Blogger. I know many of you have been blogging for awhile–so you ladies can scroll down and visit other bloggers…but for those of you that are still new to blogging…or wonder each time you write a post what all those little icons stand for…well…I’m going to help you out.
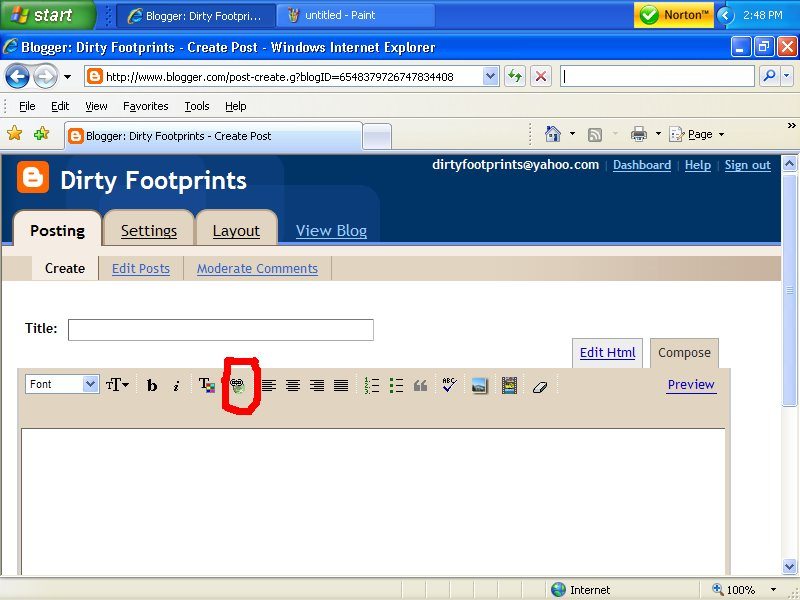 So, you see that little greenish icon that is the fifth one from the left. I circled it above in red. That is called a HYPERLINK. It is your best friend in making your posts smoother to read and slicker looking at the same time. Learn about it—love it!!
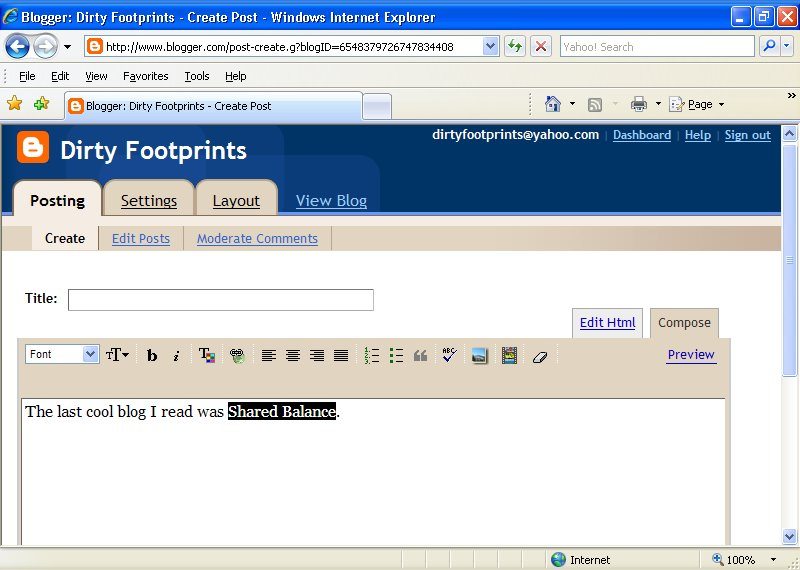 Say I started my post off by saying “The last cool blog I read was Shared Balance.” And I wanted to make Shared Balance a hyperlink—so that it changes color and when the reader pushes on it…it then will lead them to the site. What you do–is after you wrote the word(s) you highlight it with your cursor then hit the HYPERLINK icon.
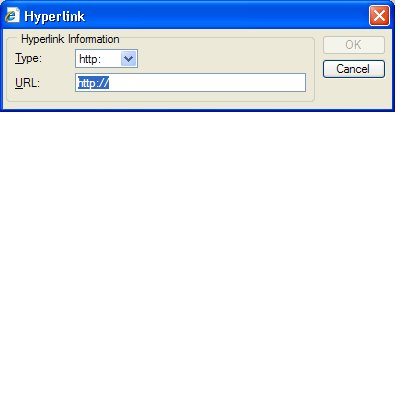
A little box like the one above (sorry its so far away…I’m having technical difficulties in explaining technology!!! Remember–I’m an Artist!) will pop up. All you have to do is write the URL code into it and hit OK. Bingo! You created yourself a hyperlink to a whole new dimension of blogging!!! No longer will you have to break up the flow of your writing with http:/// jumbo!!
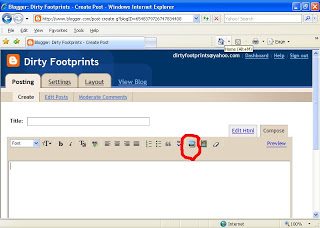
Ok. So now you want to insert a photo. Hopefully you know to hit the icon I circled above.
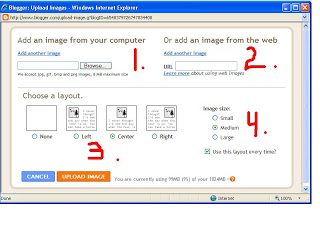 When you do a new window appears. You now have lots of options! Let’s start with SECTION 1. This is where you can upload photos from your own computer. All you need to do is hit the word “Browse” in section one and another window will pop up prompting you to find your photo file on the computer. You are on your own from there. Ok. But, say you want to enter more then one photo…blogger will let you group up to five (I think) at one time by hitting the link that says “add another image”. But, if you want to add twenty or a hundred images you can…but you will have to keep doing it in bunches of five. If you upload your photos first then write your post (like I do), remember that each time you add a new bunch of photos they will be above the previous ones you uploaded. Nothing major. But it can save you time later if you know that. Once you upload your photos you can then click on them and move them around in your post….but that’s where SECTION 3 comes in play.
See SECTION 3—before you upload your photos you need to think about what you want to commit to as in placement. If you hit the first one that says “NONE” You will have more free range of where you’re photos go. You will be able to put them next to text if you wish even. The other three LEFT, CENTER , and RIGHT will commit your photos to always staying aligned on that position of your post. Get it? If not…fool around with it…and you’ll catch on quick.
SECTION 4 is just asking you what size you want to keep your photos at. Personally I like medium.
But maybe some of you have been wondering what SECTION 2 is all about. Right? Well, this is basically for stealing images—let’s be honest. You have to be careful when using this section, and Blogger also warns you about it. Now a-days everything is protected by copyright…so it can get real tricky and even scary if you start posting other peoples photos without their permission. I only really use SECTION 3 when I want to show someone else’s Art that I asked or if I know them and really know that I am not using their photos viciously….or I use them to show a product–like the Yoga pants in a previous post below. I make sure to hyperlink the photo to the company’s website..and to mention who the photo belongs to. I think that’s the safest bet. But, say you’re buddies with Erica from Blu Jay Studio, like many of us are, and you wanted to steal her awesome photo of Frida. So what you do is first go to the site you want to steal a photo from.
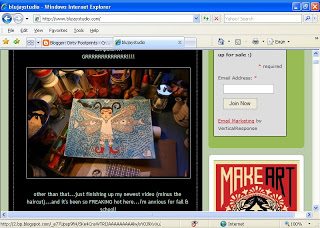
Above is Erica’s blog. I want to take her beautiful painting of Frida and add it to my blog to show the world how awesome it is….so first thing I do is right click on the image. A little white box will pop up. You want to click on the word “Properties”. When you do…another box will pop up like below:
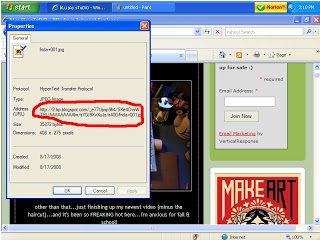
See where I circled in red? That is the URL address you want to enter into SECTION 2 on the photo upload box if you want to add Erica’s photo to your own post. Understand? Pretty easy. Now—once you upload the photo to your post, be sure then to highlight it with your cursor and hyperlink it to Erica’s blog. That is just the right thing to do!
Ok…how are we doing? Do you need time to catch up on writing notes? The next little thing I’m going to teach you is how to embed a video into your blog. Easy stuff!!
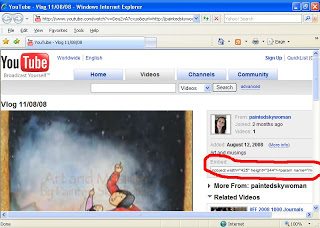
So above is the YouTube page where you can find Renee’s first video. Say you totally love it and want to share it on your blog…what you will need to do is go to the area in which I circled in red. Highlight the code you see there and then copy it. Hopefully you know how to do–but you can do it by right clicking after you highlight it then hit copy. Now the embed code is on your computer’s clipboard. Now your job is to get back to your Blogger post.
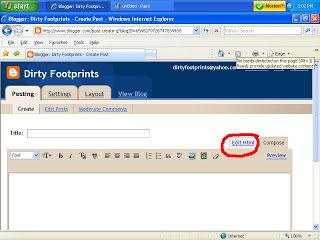
Notice what I circled in red this time…Edit Html. OOOHHH! Scary stuff–huh? This is the area all that we have written turns into computer mumbo jumbo. But, this is also the place you always want to enter embed code. If you paste embed code on the area called Compose, it won’t work. You must do it in the Edit Html section. Put two stars next to that in your notes!!!
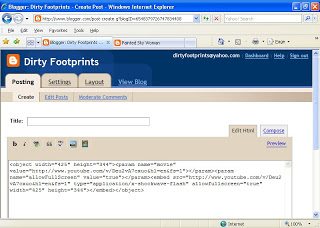
So now that you have opened up the Edit Html section click your cursor on it and after right click hit paste. The code should look something like the one above. Now all you have to do is hit the Compose section and you will see your YouTube video posted and ready to go in your blog. You can move it around if you wish. Just note that the video won’t show up until you publish your post. No need to worry.
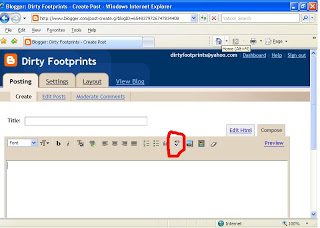
Ok…last thing. This is one of my pet peeves. Right before you hit Publish Post please, please, please hit the icon I circled above. That is spellcheck–just like spellcheck on a Word Document. This little icon will help aid you from any silly mistakes–most of the time. It doesn’t help for grammar or if you put a correct spelled word in the wrong place. But spellcheck, even with its minor faults, is still your friend!
I hope this little tutorial helps. I am by no means any computer expert. So please don’t start shooting tons of questions at me. Everything I’ve shown here I’ve learned through reading on the internet. Blogger itself gives great help and advice. Also there are many blogs out there that are made just to help bloggers. Tips for New Bloggers is a good one! See–that’s a hyperlink…now you know how to do it!
Join The Paint Wisdom Newsletter!
My weekly newsletter is filled with studio updates,
announcements,& short musings intended to nourish your Artist Soul.
